Even More Wiggly (Cubic) Bézier Curves With OpenGL
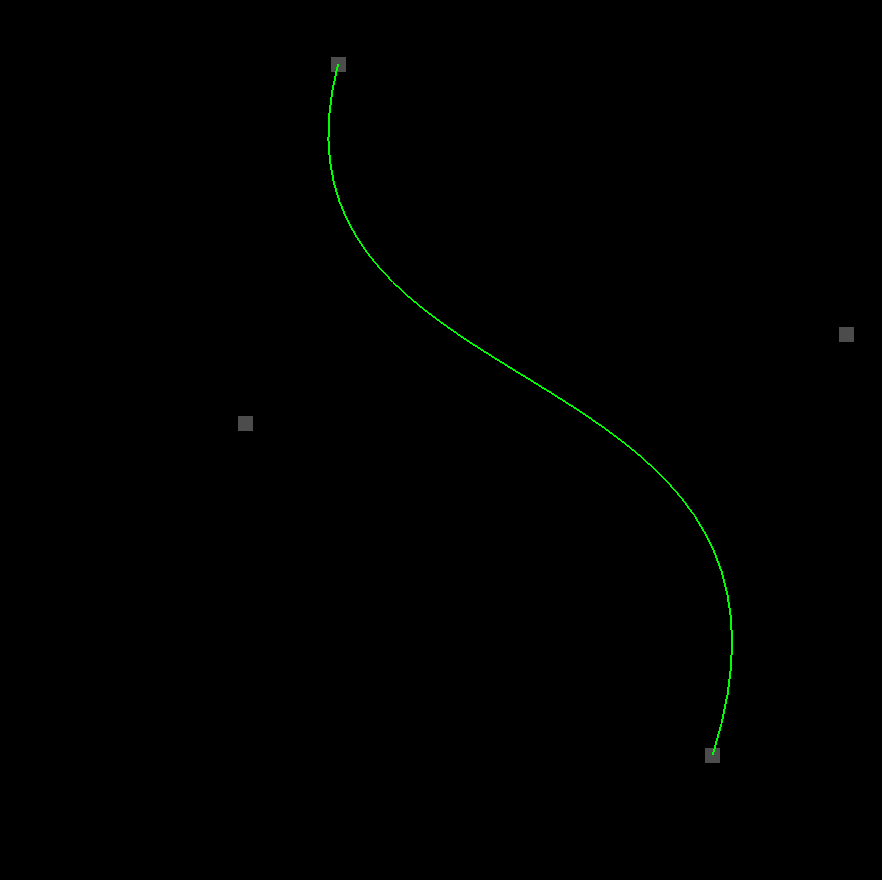
Hey there computer humans! Think fast! I have another installment for you in my series on 2D game development with OpenGL. This one will be brief. Today we’ll be making slight modifications to our previous tutorial on wiggly (quadratic) Bézier curves so that it uses a (wiggly) cubic Bézier curve instead. It’ll look something like this (only animated):
But in case you’re just joining us, here are links to all the previous tutorials:
- Just Draw A Stupid Triangle With OpenGL
- Making A Dopey Circle Thing With OpenGL
- Just Interpolate Already With OpenGL
- Make A Stinking Sprite With OpenGL
- Distorting Sprites’ UV Mappings With OpenGL
- Silly Spiky Stars And Donuts With OpenGL
- Rounding All The Corners With OpenGL
- Dirt Basic Animation With OpenGL
- Windows 95 Tiling Wallpaper With OpenGL
- Spiffy UV Parallax Effect With OpenGL
- More Efficient Spiffy UV Parallax Effect With OpenGL
- Wiggly Bézier Curves With OpenGL
- One-Dimensional Bézier Graph With OpenGL
Of course you’ll need to check out the very first tutorial if you want to get your project folder set up with three.js to run the code I’m going to be writing.
Here Is The Code
I’ll waste no time. Obviously the code will be almost identical to the first tutorial on quadratic Bézier curves.
Make a new file in the opengl_examples folder called wiggly_cubic_bezier.html and copy/paste this code in:
<!DOCTYPE html>
<html lang="en">
  <head>
    <title>Wiggly Cubic Bézier Curves With OpenGL</title>
    <meta charset="utf-8">
    <meta name="viewport" content="width=device-width, user-scalable=no, minimum-scale=1.0, maximum-scale=1.0">
    <style>
      body {
        color: #ffffff;
        background-color: #000000;
        margin: 0px;
        overflow: hidden;
      }
    </style>
  </head>
  <body>

    <div id="container"></div>

    <script src="js/three.js"></script>
    <script src="js/Detector.js"></script>

    <script>

      var webGlSupported = Detector.webgl;
      if (!webGlSupported) {
        Detector.addGetWebGLMessage();
      }

      const GREEN = new THREE.Color(0.0, 1.0, 0.0);
      const GRAY = new THREE.Color(0.3, 0.3, 0.3);

      const CURVE_POINTS_COUNT = 40;

      var container = undefined;
      var camera = undefined;
      var scene = undefined;
      var renderer = undefined;

      var clock = undefined;
      var curve = undefined;

      var startDot = undefined;
      var firstControlDot = undefined;
      var secondControlDot = undefined;
      var endDot = undefined;
      var dots = undefined;

      initializeCamera();
      initializeScene();
      initializeRenderer();

      initializeClock();
      onTick();

      function initializeScene() {
        scene = new THREE.Scene();

        startDot = addDot(-80.0, 80.0, 40.0, -0.25 * Math.PI);
        firstControlDot = addDot(-40.0, 10.0, 50.0, 0.75 * Math.PI);
        secondControlDot = addDot(40.0, -10.0, 80.0, -0.45 * Math.PI);
        endDot = addDot(80.0, -80.0, 40.0, 0.5 * Math.PI);
        dots = [startDot, firstControlDot, secondControlDot, endDot];

        curve = new THREE.Line(
          getCurveGeometry(),
          getCurveMaterial()
        );
        curve.position.set(0.0, 0.0, 0.0);
        scene.add(curve);
      }

      function getCurveGeometry() {
        var geometry = new THREE.BufferGeometry();

        var vector3Size = 3;
        var positionsArraySize = CURVE_POINTS_COUNT * vector3Size;

        var positionsTypedArray = new Float32Array(positionsArraySize);

        var positionAttribute = new THREE.BufferAttribute(positionsTypedArray, vector3Size);
        geometry.addAttribute("position", positionAttribute);

        return geometry;
      }

      function getCurveMaterial() {
        return new THREE.LineBasicMaterial({
          color: GREEN
        });
      }

      function getDotGeometry() {
        var width = 5.0;
        var height = 5.0;
        return new THREE.PlaneBufferGeometry(width, height);
      }

      function getDotMaterial() {
        return new THREE.MeshBasicMaterial({
          color: GRAY,
          side: THREE.DoubleSide
        });
      }

      function addDot(centerX, centerY, radius, radiansPerSecond) {
        var geometry = getDotGeometry();
        var material = getDotMaterial();
        var dot = new THREE.Mesh(geometry, material);
        scene.add(dot);

        dot.centerX = centerX;
        dot.centerY = centerY;
        dot.radius = radius;
        dot.radiansPerSecond = radiansPerSecond;

        return dot;
      }

      function initializeCamera() {
        var aspectRatio = window.innerWidth / window.innerHeight;
        var screenWidth = undefined;
        var screenHeight = undefined;
        if (aspectRatio > 1.0) {
          screenWidth = 320.0 * aspectRatio;
          screenHeight = 320.0;
        } else {
          screenWidth = 320.0;
          screenHeight = 320.0 / aspectRatio;
        }

        var nearPlane = 1.0;
        var farPlane = 1000.0;
        camera = new THREE.OrthographicCamera(
          -0.5 * screenWidth,
          0.5 * screenWidth,
          0.5 * screenHeight,
          -0.5 * screenHeight,

          nearPlane,
          farPlane
        );

        var distanceFromScene = 500.0;
        camera.position.set(0.0, 0.0, distanceFromScene);
      }

      function initializeRenderer() {
        renderer = new THREE.WebGLRenderer();
        renderer.setPixelRatio(window.devicePixelRatio);
        renderer.setSize(window.innerWidth, window.innerHeight);

        container = document.getElementById("container");
        container.appendChild(renderer.domElement);
      }

      function renderScene() {
        renderer.render(scene, camera);
      }

      function initializeClock() {
        clock = new THREE.Clock();
      }

      // 1
      function getCubicBezierPoint(startPoint, firstControlPoint, secondControlPoint, endPoint, t) {
        var u = (1.0 - t);

        var tSquared = t * t;
        var uSquared = u * u;

        var tCubed = t * t * t;
        var uCubed = u * u * u;

        var x = uCubed * startPoint.x +
          3.0 * uSquared * t * firstControlPoint.x +
          3.0 * u * tSquared * secondControlPoint.x +
          tCubed * endPoint.x;
        var y = uCubed * startPoint.y +
          3.0 * uSquared * t * firstControlPoint.y +
          3.0 * u * tSquared * secondControlPoint.y +
          tCubed * endPoint.y;

        return new THREE.Vector3(x, y, 0.0);
      }

      function updateCurvePoints() {

        var positionAttribute = curve.geometry.getAttribute("position");

        for (var pointIndex = 0; pointIndex < CURVE_POINTS_COUNT; pointIndex++) {
          var t = pointIndex / (CURVE_POINTS_COUNT - 1);

          var curvePoint = getCubicBezierPoint(
            startDot.position,
            firstControlDot.position,
            secondControlDot.position,
            endDot.position,
            t
          );

          positionAttribute.setX(pointIndex, curvePoint.x);
          positionAttribute.setY(pointIndex, curvePoint.y);
        }

        positionAttribute.needsUpdate = true;
      }

      function updateDotLocations() {
        var elapsedTime = clock.getElapsedTime();

        for (var dotIndex = 0; dotIndex < dots.length; dotIndex++) {
          var dot = dots[dotIndex];

          var angle = elapsedTime * dot.radiansPerSecond;

          dot.position.setX(dot.centerX + Math.cos(angle) * dot.radius);
          dot.position.setY(dot.centerY + Math.sin(angle) * dot.radius);
        }
      }

      function onTick() {
        updateDotLocations();

        updateCurvePoints();

        renderScene();
        window.requestAnimationFrame(onTick);
      }

    </script>

  </body>
</html>
Tada!
Scary Math Words Again
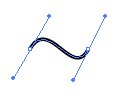
I mentioned in the other tutorial that there are several (actually infinitely many, but only the first few are worthwhile) orders of Bézier curve. First-order is a straight line. Boring. Second-order (also known as quadratic) has just one control point and looks like this. And third-order (also known as cubic) is the one that they use in pretty much every image editing program ever. It has two control points, and it’s the one we’ll be working with today.
Another Frightening Formula
Don’t worry–this formula is just like the one we used for the quadratic curve. It’s just a little longer, since it has to interpolate between four points instead of just three. Let’s start with the formula you can find on Wikipedia.

Bleh. And here’s the JavaScript that I boiled it down to.
// 1
function getCubicBezierPoint(startPoint, firstControlPoint, secondControlPoint, endPoint, t) {
  var u = (1.0 - t);

  var tSquared = t * t;
  var uSquared = u * u;

  var tCubed = t * t * t;
  var uCubed = u * u * u;

  var x = uCubed * startPoint.x +
    3.0 * uSquared * t * firstControlPoint.x +
    3.0 * u * tSquared * secondControlPoint.x +
    tCubed * endPoint.x;
  var y = uCubed * startPoint.y +
    3.0 * uSquared * t * firstControlPoint.y +
    3.0 * u * tSquared * secondControlPoint.y +
    tCubed * endPoint.y;

  return new THREE.Vector3(x, y, 0.0);
}
Again, the P0 through P3 things are just the startPoint, firstControlPoint, secondControlPoint, and endPoint. From there, I turned (1 - t) into u and made variables for t2, u2, t3, and u3. I think writing them out this way makes everything a little easier to manage. From there, I just substituted my variables into the formula. Like before, we’re using this formula for both the x and y coordinates.
And that’s it!
Like I said, everything else in the code is pretty much the same. I added an extra dancing dot so that we could plug its position into getCubicBezierPoint… but that’s pretty much it. Cubic Bézier curves are a lot more versatile than their quadratic counterparts. As you can see by watching the demo, they can bend in two directions at once. They’re also generally more useful when you place them end-to-end to form a composite Bézier curve. You can set up their control points so that one curve blends seamlessly into the next curve. I’ll have to show you how that works too–but that’s material for another tutorial. 😊
But They’ll Never Take Our Downloadables!
Click here to run the finished product!
And here’s a link to a downloadable version of the source code: wiggly_cubic_bezier.html. Note that you’ll need to run it from inside the folder structure that we set up in the first tutorial.