Making A Dopey Circle Thing With OpenGL
Hey, how’s it going? I’m back with a second tutorial this week that builds on top of the example I showed you in my previous post. We’re going to be working with three.js to draw something with OpenGL again. But this time it’ll be a little more fun than the triangle we drew last time. That’s right, this time we’re going to draw A CIRCLE!
Without Delay
Let’s get down to business! We’re going to be working in the same folder where we wrote the triangle example, so if you haven’t completed that tutorial yet, go back and do that first. Once you’re ready, let’s make a new HTML file in the same directory as just_draw_a_stupid_triangle.html. Except we’ll name this one making_a_dopey_circle_thing.html.
To keep me from jumping around too much, I’m just going to dump all of the code right here. You can copy/paste it into the file and save it, and then I’ll go over each of the numbered sections one-by-one.
Here’s all of the code:
<!DOCTYPE html>
<html lang="en">
  <head>
    <title>Making A Dopey Circle Thing With OpenGL</title>
    <meta charset="utf-8">
    <meta name="viewport" content="width=device-width, user-scalable=no, minimum-scale=1.0, maximum-scale=1.0">
    <style>
      body {
        color: #ffffff;
        background-color: #000000;
        margin: 0px;
        overflow: hidden;
      }
    </style>
  </head>
  <body>

    <div id="container"></div>

    <script src="js/three.js"></script>
    <script src="js/Detector.js"></script>

    <script>

      var webGlSupported = Detector.webgl;
      if (!webGlSupported) {
        Detector.addGetWebGLMessage();
      }

      var container = undefined;
      var camera = undefined;
      var scene = undefined;
      var renderer = undefined;

      initializeCamera();
      initializeScene();
      initializeRenderer();
      renderScene();

      function initializeCamera() {
        var aspectRatio = window.innerWidth / window.innerHeight;
        var screenWidth = undefined;
        var screenHeight = undefined;
        if (aspectRatio > 1.0) {
          screenWidth = 320.0 * aspectRatio;
          screenHeight = 320.0;
        } else {
          screenWidth = 320.0;
          screenHeight = 320.0 / aspectRatio;
        }

        var nearPlane = 1.0;
        var farPlane = 1000.0;
        camera = new THREE.OrthographicCamera(
          -0.5 * screenWidth,
          0.5 * screenWidth,
          0.5 * screenHeight,
          -0.5 * screenHeight,

          nearPlane,
          farPlane
        );

        var distanceFromScene = 500.0;
        camera.position.set(0.0, 0.0, distanceFromScene);
      }

      function initializeScene() {
        scene = new THREE.Scene();

        // 1
        var radius = 65.0;
        var sidesCount = 6;
        var geometry = getRegularPolygonGeometry(radius, sidesCount);

        // 6
        var magenta = new THREE.Color(1.0, 0.0, 1.0);

        var material = new THREE.MeshBasicMaterial({
          color: magenta,
          side: THREE.DoubleSide
        });

        var mesh = new THREE.Mesh(geometry, material);
        mesh.position.set(0.0, 0.0, 0.0);
        scene.add(mesh);
      }

      function getRegularPolygonGeometry(radius, sidesCount) {
        // 2
        var geometry = new THREE.Geometry();

        // 3
        var centerPoint = new THREE.Vector3(0.0, 0.0, 0.0);
        geometry.vertices.push(centerPoint);

        for (var outerPointIndex = 0; outerPointIndex < sidesCount; outerPointIndex++) {
          var outerPointProgress = outerPointIndex / sidesCount;
          var angleInRadians = outerPointProgress * 2.0 * Math.PI;

          var x = Math.cos(angleInRadians) * radius;
          var y = Math.sin(angleInRadians) * radius;

          var outerPoint = new THREE.Vector3(x, y, 0.0);
          geometry.vertices.push(outerPoint);
        }

        // 4
        var centerPointIndex = 0;

        for (faceIndex = 0; faceIndex < sidesCount; faceIndex++) {
          var face = new THREE.Face3();

          var trailingOuterPointIndex = faceIndex + 1;

          var leadingOuterPointIndex = faceIndex + 2;
          if (leadingOuterPointIndex > sidesCount) {
            leadingOuterPointIndex -= sidesCount;
          }

          var face = new THREE.Face3(centerPointIndex, trailingOuterPointIndex, leadingOuterPointIndex);

          geometry.faces.push(face);
        }

        // 5
        return geometry;
      }

      function initializeRenderer() {
        renderer = new THREE.WebGLRenderer();
        renderer.setPixelRatio(window.devicePixelRatio);
        renderer.setSize(window.innerWidth, window.innerHeight);

        container = document.getElementById("container");
        container.appendChild(renderer.domElement);
      }

      function renderScene() {
        renderer.render(scene, camera);
      }

    </script>

  </body>
</html>
There you go!
Looks Familiar…
Glancing over the code quickly, you’ll notice that it’s mostly the same. I’ve taken the liberty of pulling the camera functionality out of initializeScene and placing it in its own function (initializeCamera) that also gets called at the beginning of the script. I did this to keep things less cluttered. In general, it’s a good idea to break each function up so it’s as short as you can possibly make it. That’s because shorter functions are easier for humans to grok. They also help you keep responsibilities clearly divided and intents clearly labeled within your code–so that other programmers will be able to make sense of it more easily.
What Does It Mean?

Back in initializeScene, I’ve made some more pretty big changes. We’ll start at // 1.
// 1
var radius = 65.0;
var sidesCount = 6;
var geometry = getRegularPolygonGeometry(radius, sidesCount);
Okay. So it looks like I’m specifying some properties of a shape. It’s going to have a radius of 65.0 units, and it’ll have 6 sides. I’m passing the values into a function called getRegularPolygonGeometry… which I’ve defined right below initializeScene. So scroll on down and find part // 2.
Polygons? I Thought This Was A Circle.
Wait a second. If we’re trying to draw a circle here, why did I call the function getRegularPolygonGeometry?

Back in the first tutorial, I told you that everything in every OpenGL game you’ve ever played was made up of triangles. So complex polygons are nothing more than multiple triangles put side-by-side. But what if you want to draw something that’s not a polygon? What if you want to draw a curved shape, like a circle?
Believe it or not, there is no way to specify a curved shape in OpenGL. Yes, you read that correctly. It’s impossible.
Uhh… what? As you know, there are plenty of OpenGL games with curved shapes in them. So either I’m lying or there’s some other weird magic at work here. What gives?

Even though there’s no way to draw a perfect curve in OpenGL, it’s pretty easy to draw an approximated curve. You can try to split any curved shape up into triangles, just like you would for any polygon. It’s just that those triangles have to be very, very small, or the curve will start to look chunky.
Although drawing so many triangles sounds like it’s going to be pretty performance-intensive, modern graphics processors can handle it. Remember, we should try not to worry about performance until a bottleneck develops. It seems like thousands of tiny triangles would be a lot of work, but I can tell you from experience that the number of vertices in a shape is almost never the thing that overloads your graphics pipeline first. In a typical game, there are many other factors your computer needs to keep track of. If we’re placing bets on what’s slowing your game down, I’d put my money on one of them instead. Modern 3D games often need to render millions of triangles every frame. At most, one of our 2D scenes might need to render a few thousand. By comparison, it’s practically nothing.
Back To The Code
Now where was I?
// 2
var geometry = new THREE.Geometry();
Ah, yes. Here we’re creating a Geometry object. Except this time it’s the Geometry of a regular polygon, so it’s going to contain multiple triangles. To define those triangles, first we’re going to have to define their points.
The Plural Of ‘Vertex’ Is ‘Vertices’
// 3
var centerPoint = new THREE.Vector3(0.0, 0.0, 0.0);
geometry.vertices.push(centerPoint);

for (var outerPointIndex = 0; outerPointIndex < sidesCount; outerPointIndex++) {
  var outerPointProgress = outerPointIndex / sidesCount;
  var angleInRadians = outerPointProgress * 2.0 * Math.PI;

  var x = Math.cos(angleInRadians) * radius;
  var y = Math.sin(angleInRadians) * radius;

  var outerPoint = new THREE.Vector3(x, y, 0.0);
  geometry.vertices.push(outerPoint);
}
Don’t let the for loop scare you. This isn’t rocket science.
The first thing we’re doing is defining a point at the center of our regular polygon. To keep things simple, we’ll keep the center at the origin, (0.0, 0.0). We add that center point to our vertices array, and after that it gets a little intense. What does this part mean?
for (var outerPointIndex = 0; outerPointIndex < sidesCount; outerPointIndex++) {
All this is doing is defining a loop. If you’re a seasoned programmer you’ll breeze through this, but I’ll give a quick overview here for those of us who haven’t written much code before. We’re going to run the code inside the {} braces several times in a row. How many times? In this case, the answer is sidesCount times. We’re declaring a variable called outerPointIndex, and we’re starting it with a value of 0. Each time we finish running the code in the braces, we’ll add 1 to its value–that’s all that outerPointIndex++ means. And we’ll keep looping as long as outerPointIndex is less than sidesCount. That means if we start our function with sidesCount with a value of 6, then our loop would run six times… with the following values: 0, 1, 2, 3, 4, and finally 5.
Okay. We’re running the code sidesCount times. But what does the code actually do? It’s building the points around the outside of a regular polygon. If your regular polygon had six sides, the points would be here:
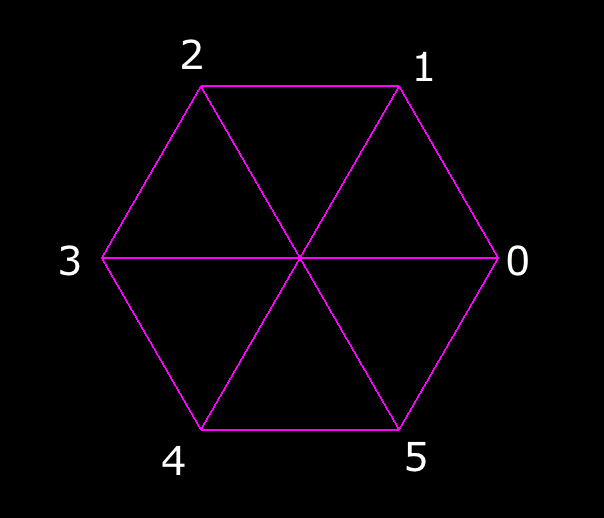
Each outer point is marked with its outerPointIndex value. Now let’s take a look at the code inside the loop.
First, we’re getting the value of outerPointIndex / sidesCount and storing it in outerPointProgress. The result will be somewhere between 0.0 and 1.0. You could think of this value as a measure of how close we are to finishing the polygon. The value for outerPointIndex 0 will always be 0.0, and if our polygon has 6 sides, then the value for each successive point will increase by 1 / 6, which happens to come out to about 0.1666666666666666. After we calculate the outerPointProgress, we multiply it by a factor of 2.0 * Math.PI. Why? Because that’s how we convert the progress fraction into a value in radians. You can think of this like taking the six points of our polygon and spacing them out evenly around an imaginary circle.
So the values for our six points would be as follows:
outerPointIndex | outerPointProgress | angleInRadians |
|---|---|---|
| 0 | 0.0000000000000000 | 0.000000000000000 |
| 1 | 0.1666666666666666 | 1.047197551196597 |
| 2 | 0.3333333333333333 | 2.094395102393195 |
| 3 | 0.5000000000000000 | 3.141592653589793 |
| 4 | 0.6666666666666666 | 4.188790204786390 |
| 5 | 0.8333333333333334 | 5.235987755982989 |
Each time we increment the outerPointIndex, we also increase the value of outerPointProgress by 1 / 6, and consequently, we increase the value of angleInRadians by Math.PI / 3. If you look closely, you’ll see that the angleInRadians value for the fourth point is 3.14159 something, which happens to be the value of PI. That makes sense, since it’s halfway around our imaginary circle. Now that you mention it, this imaginary circle is starting to remind me of something I learned about in high school and then tried to forget. Sorry–it’s back. It’s our old friend, the dreaded unit circle.
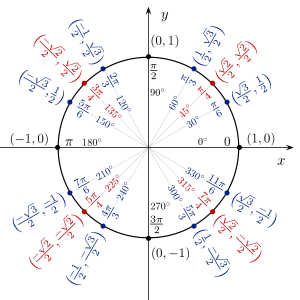
Hopefully that didn’t trigger too many unpleasant memories. I’ll try to avoid mentioning high school from now on. At any rate, the unit circle is actually pretty handy when it comes to drawing shapes. Do you recall anything about sine and cosine? If you need a refresher, no worries. The values in the parentheses around the outside there are actually what you’d get if you plugged the angle values into cos and sin to get the x and y values, respectively, of a point around the circle. For instance, if you plug in our second point’s angle, which is Math.PI / 3, or 1.047197551196597, you’d get a point at (0.500000000000000, 0.8660254037844386). It turns out another way to express this is (1 / 2, Math.sqrt(3) / 2).
So when we say this…
var x = Math.cos(angleInRadians) * radius;
var y = Math.sin(angleInRadians) * radius;
We’re just taking the values from cos and sin around our unit circle, and we’re saving them in their own x and y variables. Except we’re doing something else at the same time–we’re multiplying by the radius that we passed in. That’s because, as its name implies, the unit circle has a radius of just one unit. We set up our coordinate system so that the drawing area would be 320.0 units wide. Therefore, we’ll need our shape to have a larger radius so that we can actually see it on the screen. To achieve this, all we have to do is multiply.
Finally, once we’ve calculated the x and y values for each point around our polygon, we store those points in a THREE.Vector3 object with 0.0 for the z coordinate, just like we did in the first tutorial. After we create each Vector3, we add it to our vertices array and move on.
var outerPoint = new THREE.Vector3(x, y, 0.0);
geometry.vertices.push(outerPoint);
What About The Faces?
Did somebody say faces? 😛

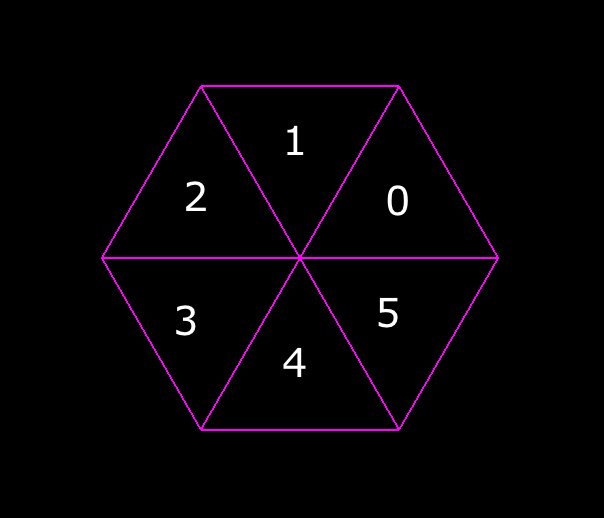
When we were drawing just one triangle, we had to create just one Face3 object for it. But now that we’re drawing a regular polygon, we’re going to need to specify a Face3 object for each side. If we wanted our polygon to have a sidesCount of 6, then we’d want it divided up into triangles with the following indices.
This looks like a job for a second for loop!
// 4
var centerPointIndex = 0;

for (faceIndex = 0; faceIndex < sidesCount; faceIndex++) {
  var face = new THREE.Face3();

  var trailingOuterPointIndex = faceIndex + 1;

  var leadingOuterPointIndex = faceIndex + 2;
  if (leadingOuterPointIndex > sidesCount) {
    leadingOuterPointIndex -= sidesCount;
  }

  var face = new THREE.Face3(centerPointIndex, trailingOuterPointIndex, leadingOuterPointIndex);

  geometry.faces.push(face);
}
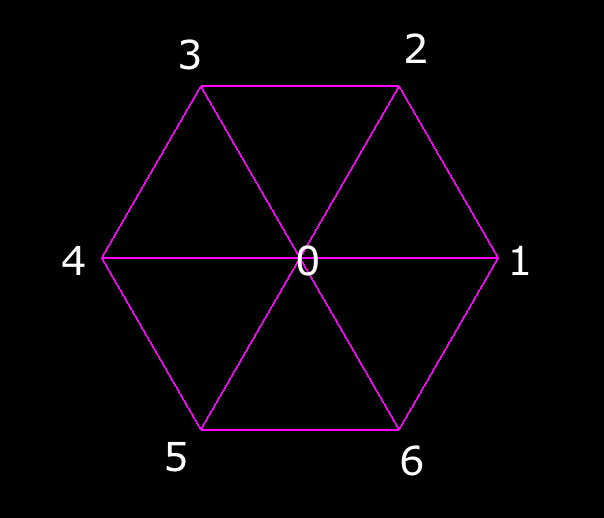
Before we start our loop, we declare that the index of the center point is 0. That’s because it was the first point that we added to the vertices array. Then, we added all the outer points on top of it. So at this point, the indices for all of the points in the vertices array look like this:
It might feel like our loop is doing something complicated, but if you pay attention to the pattern in the output, it’s simple to see how it’s creating the Face3 objects. If your regular polygon had a sidesCount of 6, you’d get faces with the following indices:
faceIndex | centerPointIndex | trailingOuterPointIndex | leadingOuterPointIndex |
|---|---|---|---|
| 0 | 0 | 1 | 2 |
| 1 | 0 | 2 | 3 |
| 2 | 0 | 3 | 4 |
| 3 | 0 | 4 | 5 |
| 4 | 0 | 5 | 6 |
| 5 | 0 | 6 | 1 |
We’re literally just telling OpenGL how to connect the dots. When we get to the last Face3, our leadingOuterPointIndex would hit a value of 7, which doesn’t correspond to any point. To avoid this, we just wrap it back around to 1 by subtracting sidesCount.
Once again, we push each Face3 onto the faces array after it’s created.
Can’t Remember Why I’m Here

Part // 5 is just one line, but I decided to enumerate it to remind us what we just finished doing. We’re at the bottom of the function (getRegularPolygonGeometry) that builds and returns our polygon geometry object. …And we called this function as part of initializeScene. So now that we’ve created a new THREE.Geometry object, we’ve defined the points of the triangles that make it up, and we’ve spelled out which points belong to which triangles, we’re finally ready to return the geometry to the calling function. Oh yeah, that’s right.
Plugging It All In
To find part // 6, you’ll have to scroll back up to where getRegularPolygonGeometry returns in initializeScene.
// 6
var magenta = new THREE.Color(1.0, 0.0, 1.0);

var material = new THREE.MeshBasicMaterial({
  color: magenta,
  side: THREE.DoubleSide
});

var mesh = new THREE.Mesh(geometry, material);
mesh.position.set(0.0, 0.0, 0.0);
scene.add(mesh);
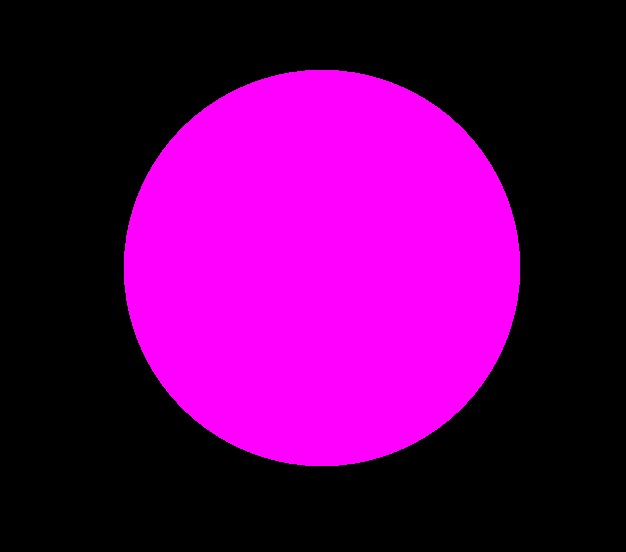
I thought it would be boring to draw another green shape, so this time I decided to try something different. When you turn down a pixel’s green channel to 0.0 and turn up its red and blue channels all the way to 1.0, the resulting color is magenta. Fancy.
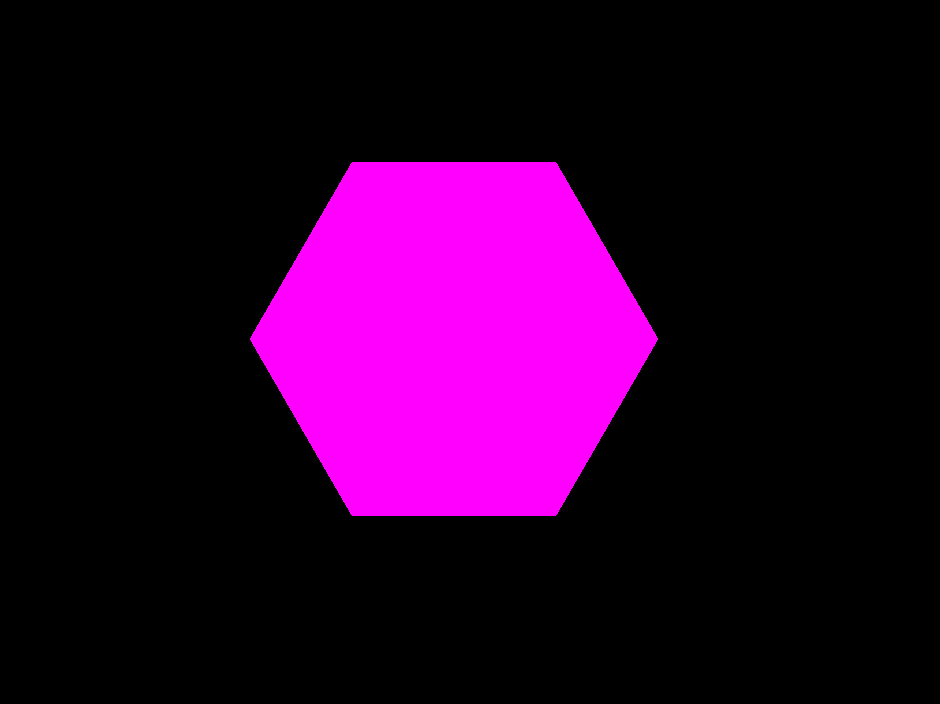
The rest is basically the same as what we did in the first tutorial. We create a THREE.Mesh object to pair our regular polygon geometry with the double-sided, brightly-colored material we just created. Then we add that mesh to the scene. And voila! Go ahead and open the HTML file in your web browser. You should get the following lovely, magenta hexagon.
But It’s Still Not A Circle
I almost forgot that this is supposed to be a tutorial about drawing circles, not hexagons. Fear not, for this is easily remedied. Back at part // 1, we gave our polygon a radius of 65.0 and a sidesCount of 6. What happens when we mess with these values? Let’s find out.
Try changing the sidesCount to 12 and refreshing the page in your browser.
Nice! If I’m not mistaken, that’s known as a dodecagon.
Now just for fun, let’s lower the value to 3 and refresh once again.
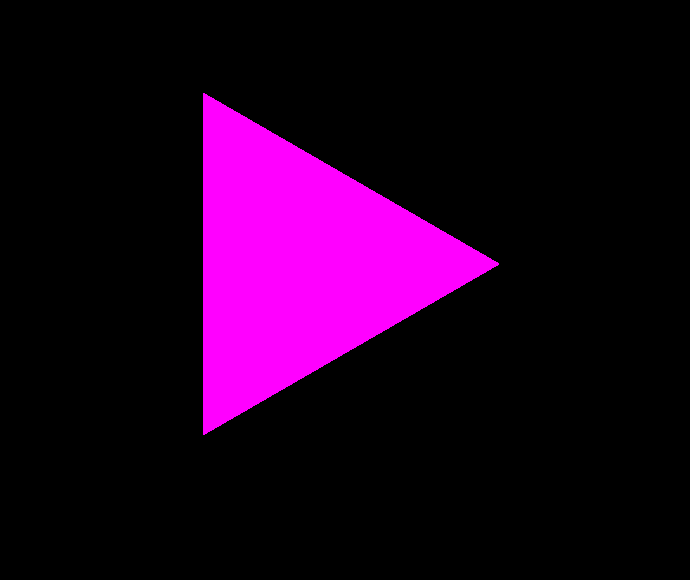
Heh, just what you’d expect.
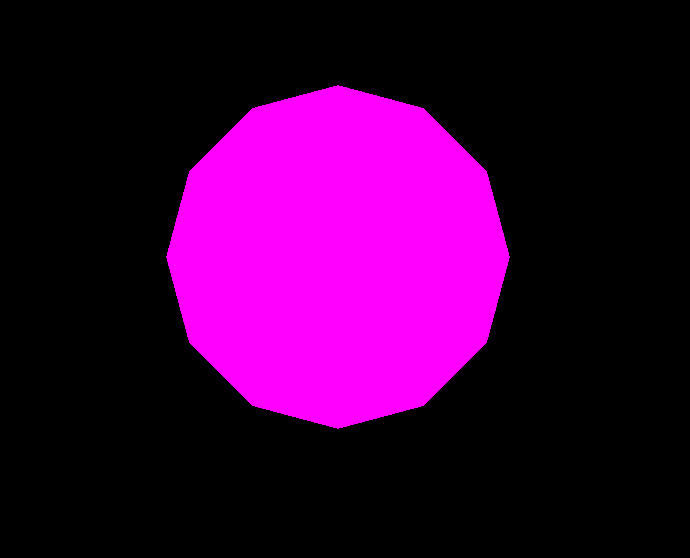
But I promised you a circle. Let’s try turning the sidesCount all the way up to 80!
It’s technically not a circle. It’s an octacontagon. But you could’ve fooled me. And in a game, that’s all that matters.
Feel free to mess around with the radius value as well. Make a small circle. Make a big circle. Geometry is fun!
Over Nine Thousand
Just to prove a point, I’d like you to make one last little change. Try turning the sidesCount up again. This time to 900. And again… to 9000. And again… to 90000!

You might experience a slight hiccup when the page is loading on that last one, but only if your computer is pretty old, and even then only if you’re paying really close attention. That’s because modern computers are fast. Outrageously fast. Mind-blowingly fast.

Also, it’s important to point out that any slowdown you did experience probably wasn’t caused by your graphics processor. The bottleneck probably formed in the JavaScript that ran on your CPU. Writing performant OpenGL code is a constant balancing act between CPU and GPU. If your game has to fill a lot of pixels with a heavy shader program, then your GPU might not be able to keep up. But if your shader is simple, as is often the case in 2D games, then your CPU will probably be the first to buckle.
I’ll talk a lot more about these shader programs in future tutorials, but for the time being, let’s simply appreciate the sheer speed of modern hardware as we gaze upon our glorious magenta creation.
Now You’re Playing With Power
If you’ve made it this far, take a moment to congratulate yourself. Seriously! OpenGL isn’t easy. At times it’s actually infuriatingly tedious. …At least when you’re still mastering the basics. Nevertheless, you’ve persevered through the worst of it. From here on out, the learning feels a lot less like high school, and the possibilities really begin to explode.
I hope you’ll stick around for the next few tutorials that I’m about to write!
Downloadables
Click here to run the finished product!
And here’s a link to a downloadable version of the source code: making_a_dopey_circle_thing.html. Note that you’ll need to run it from inside the folder structure that we set up in the previous tutorial.