Dirt Basic Animation With OpenGL
Hi again! The next installment of my tutorial series on OpenGL for 2D games is a super brief, super simple introduction to animation. But you should check out all my other tutorials first if you haven’t yet.
- Just Draw A Stupid Triangle With OpenGL
- Making A Dopey Circle Thing With OpenGL
- Just Interpolate Already With OpenGL
- Make A Stinking Sprite With OpenGL
- Distorting Sprites’ UV Mappings With OpenGL
- Silly Spiky Stars And Donuts With OpenGL
- Rounding All The Corners With OpenGL
In fact, you won’t even be able to run this code if you don’t have the three.js library in its own subfolder of your project folder as described in the first tutorial.
The protagonist of our tutorial will be this three-sided, spinny, floaty thing:
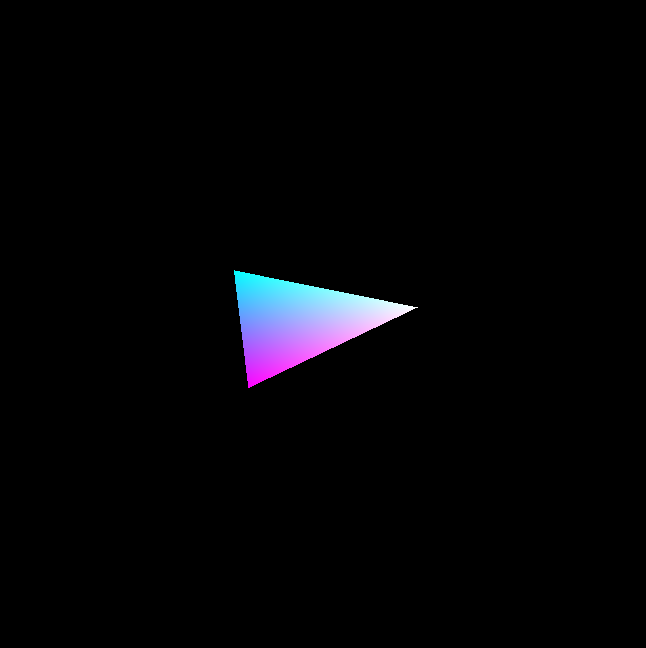
Kind of reminds me of a really old-school “educational programming language” called Logo. I wonder if anyone else remembers that.
So Anyway… Where’s The Code?
Here! It’s here. Put it in another file in your opengl_examples folder called dirt_basic_animation.html. Ctrl + C. Ctrl + V.
<!DOCTYPE html>
<html lang="en">
  <head>
    <title>Dirt Basic Animation With OpenGL</title>
    <meta charset="utf-8">
    <meta name="viewport" content="width=device-width, user-scalable=no, minimum-scale=1.0, maximum-scale=1.0">
    <style>
      body {
        color: #ffffff;
        background-color: #000000;
        margin: 0px;
        overflow: hidden;
      }
    </style>
  </head>
  <body>

    <div id="container"></div>

    <script src="js/three.js"></script>
    <script src="js/Detector.js"></script>

    <script>

      var webGlSupported = Detector.webgl;
      if (!webGlSupported) {
        Detector.addGetWebGLMessage();
      }

      const WHITE = new THREE.Color(1.0, 1.0, 1.0);
      const CYAN = new THREE.Color(0.0, 1.0, 1.0);
      const MAGENTA = new THREE.Color(1.0, 0.0, 1.0);

      const VERTEX_COLORS = [WHITE, CYAN, MAGENTA];

      var container = undefined;
      var camera = undefined;
      var scene = undefined;
      var renderer = undefined;

      var clock = undefined;
      var mesh = undefined;

      initializeCamera();
      initializeScene();
      initializeRenderer();

      // 1
      initializeClock();
      onTick();

      function initializeScene() {
        scene = new THREE.Scene();

        var geometry = getTriangleGeometry();
        var material = getMaterial();
        mesh = new THREE.Mesh(geometry, material);
        mesh.position.set(0.0, 0.0, 0.0);
        scene.add(mesh);
      }

      function getTriangleGeometry() {
        var geometry = new THREE.Geometry();

        geometry.vertices = [
          new THREE.Vector3(20.0, 0.0, 0.0),
          new THREE.Vector3(-10.0, 10.0, 0.0),
          new THREE.Vector3(-10.0, -10.0, 0.0),
        ];

        var normal = undefined;
        var face = new THREE.Face3(0, 1, 2, normal, VERTEX_COLORS);
        geometry.faces.push(face);

        return geometry;
      }

      function getMaterial() {
        return new THREE.MeshBasicMaterial({
          vertexColors: THREE.VertexColors,
          side: THREE.DoubleSide
        });
      }

      function initializeCamera() {
        var aspectRatio = window.innerWidth / window.innerHeight;
        var screenWidth = undefined;
        var screenHeight = undefined;
        if (aspectRatio > 1.0) {
          screenWidth = 320.0 * aspectRatio;
          screenHeight = 320.0;
        } else {
          screenWidth = 320.0;
          screenHeight = 320.0 / aspectRatio;
        }

        var nearPlane = 1.0;
        var farPlane = 1000.0;
        camera = new THREE.OrthographicCamera(
          -0.5 * screenWidth,
          0.5 * screenWidth,
          0.5 * screenHeight,
          -0.5 * screenHeight,

          nearPlane,
          farPlane
        );

        var distanceFromScene = 500.0;
        camera.position.set(0.0, 0.0, distanceFromScene);
      }

      function initializeRenderer() {
        renderer = new THREE.WebGLRenderer();
        renderer.setPixelRatio(window.devicePixelRatio);
        renderer.setSize(window.innerWidth, window.innerHeight);

        container = document.getElementById("container");
        container.appendChild(renderer.domElement);
      }

      function renderScene() {
        renderer.render(scene, camera);
      }

      // 2
      function initializeClock() {
        clock = new THREE.Clock();
      }

      // 4
      function updateMeshRotation(elapsedTime) {
        var radiansPerSecond = 0.75 * Math.PI;

        var angle = elapsedTime * radiansPerSecond;

        mesh.rotation.set(0.0, 0.0, angle);
      }

      // 5
      function updateMeshLocation(elapsedTime) {
        var amplitude = 50.0;
        var frequency = 0.55;

        var y = Math.sin(frequency * 2.0 * Math.PI * elapsedTime) * amplitude;

        mesh.position.set(0.0, y, 0.0);
      }

      // 3
      function onTick() {
        var elapsedTime = clock.getElapsedTime();

        updateMeshRotation(elapsedTime);
        updateMeshLocation(elapsedTime);

        renderScene();
        window.requestAnimationFrame(onTick);
      }

    </script>

  </body>
</html>
Cool. It’s relatively short. And I’m not even going to spend time going over stuff that we’ve already covered. We’ll just talk about animation.
Let’s Talk About Animation
Everyone knows about animation. I mean, we all watch TV and movies. We pretty much understand how they work. It’s just a picture that changes over time. Around 30 times per second, your TV screen updates the image it displays, and that’s frequent enough that your brain can weave the frames together and fool itself into thinking there are actual humans on the other side who are talking to you. That’s the basic concept behind computer animation as well, but of course with computers there are some additional considerations.
One of them is the frame rate–the number of times per second that your screen gets updated. 30 frames per second may have been enough for the early games… but back then the bar was much lower. With each new generation of computer hardware, the public has become accustomed to better and better visuals. Today, anything less than 60 FPS in a computer game is going to feel somewhat sluggish… and substantially subpar.
Fulfilling consumers’ demand for fluid, 60 FPS animation is rarely as easy as flipping a switch. In earlier tutorials, we’ve touched on the mind-boggling mountain of calculations that go into rendering a single shape on the screen. Multiply that mountain by the hundreds of shapes and sprites present in any modern 2D game, and you have quite the mountain range. But that’s merely what’s required to render a single frame. That same colossal profusion of operations must be executed again and again and again, sixty times each second, without the slightest interruption. Obviously modern graphics hardware is up to the task, but it must apply all manner of optimizations to achieve such a feat. The instructions your game delivers to OpenGL must be arranged in a very particular format. Otherwise the optimizations will fail, and even the most sophisticated cutting edge hardware will slow and eventually reach paralysis.
And that’s just to render the graphics. If your game logic is complex at all, you’ll also need to be careful not to clog up your CPU. It’s often necessary to split up heavy calculations across several frames, so that no individual frame takes longer than the allotted 1/60th of a second to process. Even when you do everything right, your game is rarely the only task your computer is managing at one time. On an iPhone, your processor could be diverted at any time to tackle another annoying push notification.
To deal with the inevitable fluctuations in resource availability, games have been forced to adopt a number of mitigation strategies. One of them is the variable frame rate. It may not always be possible to render each frame in 0.01666667 seconds, but when a particular frame exceeds this limit, it’s often possible to compensate somewhat by changing the amount that everything in the game moves proportionally. So if your spaceship normally moves 3.5 pixels each frame, but one frame takes twice as long to render as it’s supposed to, you can just move it 7.0 pixels that frame instead. Of course, any drop in frame rate hurts the quality of your animation, but allowing for a variable frame rate helps preserve some of its continuity.
So yeah… lots to consider when you’re dealing with animation on computers. That’s really just the beginning. I could keep going if you’d like…
Enough Jabbering. Get To The Code.
Fine. Let’s look at part // 1.
initializeCamera();
initializeScene();
initializeRenderer();

// 1
initializeClock();
onTick();
There’s two new functions that we’re calling once we’ve set up our scene. The first creates a Clock object of some sort. Looks like it’s implemented near the bottom.
Tick Tock
Yup. This is almost insultingly simple.
// 2
function initializeClock() {
  clock = new THREE.Clock();
}
The reason I marked this section is so that I could talk about what a THREE.Clock does. It’s just a handy utility that three.js puts out there so that you don’t have to keep track of time yourself. Web browsers are pretty inconsistent beasts. They weren’t originally designed with animation in mind, so they don’t always provide the same interface for tracking time. The Clock abstracts the time implementation away so that you can focus on writing your animation. Thanks, Clock.
Lights, Camera, Action!
After initializeClock, the last function to get called is onTick. Sorry that name isn’t terribly intuitive. I’ll explain in a second. Part // 3 is down at the very, very bottom.
// 3
function onTick() {
  var elapsedTime = clock.getElapsedTime();

  updateMeshRotation(elapsedTime);
  updateMeshLocation(elapsedTime);

  renderScene();
  window.requestAnimationFrame(onTick);
}
This function is what we want to call each frame. At every tick of the animation. Web browsers are a little bizarre, so if you want to animate something, they make you use this weird method… window.requestAnimationFrame. It informs the web browser that you’ve just drawn part of an animation, and that the next time it gets a chance to update, it should call the callback you give it. Since we’re calling requestAnimationFrame from onTick, and the callback we’re providing it is also onTick, we’ve basically created an endless cycle. From now on every time the browser is about to update, it will call onTick for us. Until the user gets bored and closes out of our page. 😛
But what about the other stuff before requestAnimationFrame? Well of course we’re calling renderScene to update the image on the screen. The way that’s implemented hasn’t changed at all. But we’re also getting this elapsedTime value and passing it into updateMeshRotation and updateMeshLocation. Each frame we move the mesh slightly, and then we render it. Then repeat. To infinity.
Spinny
In pretty much all 2D game engines (as well as in three.js), there are layer or node objects of some sort. In three.js, they have Object3D, of which Mesh is a subclass. These are objects that can be rendered, and they also have various properties that can be manipulated. Such properties generally include spatial characteristics like rotation, location, and scale, as well as chromatic traits such as opacity and color. Most of the animations in a typical game will be produced simply by altering combinations of these properties over time. Sure, it’s possible to pay a real artist to pre-draw your animations and then load them from a file, but even preloaded animations usually require some degree of massaging with property manipulation to make them match the feel of a game.
This is where an engine’s action system typically comes in. An action system is a standardized way of defining transitions of property values over time that allows for sequencing and composition, among other gizmos. Actions greatly simplify programmatic animation, and it’s usually stupid not to use them. It should be noted that three.js has a pretty sophisticated animation system, and if you’re planning on developing any sort of project with the library, you should definitely take advantage of it. But today I want to focus on the subatomic level of animation, to make sure we’re appreciating the most fundamental machinery of game development.
Our tricolored triangle is spins endlessly. How is this accomplished? Every frame we call this:
// 4
function updateMeshRotation(elapsedTime) {
  var radiansPerSecond = 0.75 * Math.PI;

  var angle = elapsedTime * radiansPerSecond;

  mesh.rotation.set(0.0, 0.0, angle);
}
It’s actually very simple. elapsedTime is a value representing the exact number of seconds since our clock started running. Each tick, it increases by about 0.01666667. We multiply elapsedTime by a constant to derive the angle to which our mesh should be rotated. In this way, we’ve bound our triangle’s rotation to the very passage of time. Majestic.
No doubt you’ve noticed there are two 0.0s that we’re passing into the rotation vector. That’s because three.js is designed for 3D models, which need to be able to rotate on all 3 axes. In our 2D environment, we’re only concerned with rotation around the z axis. But feel free to try rotating on the other axes, just to see what happens.
Do The Wave
I figured we should make our triangle float up and down while we’re at it. Why not? Here’s part // 5.
// 5
function updateMeshLocation(elapsedTime) {
  var amplitude = 50.0;
  var frequency = 0.55;

  var y = Math.sin(frequency * 2.0 * Math.PI * elapsedTime) * amplitude;

  mesh.position.set(0.0, y, 0.0);
}
It’s pretty similar. We’re defining a formula to calculate a y coordinate. The formula happens to follow a sine wave pattern, which turns out to be one of the most versatile functions in animation, and indeed in computer graphics as a whole.
Nothing To It
See? This kind of animation is sublimely simple. We’re merely linking rotation and location to time with a formula. Now that you get it, you should definitely try to do some fancier animations on your own. Can you make the triangle fly in a circle? How about making its rotation wobble back and forth? You could even mess with its scale property. The world is your burrito.
Thy Downloadables, Your Highness
Click here to run the finished product!
And here’s a link to a downloadable version of the source code: dirt_basic_animation.html. Note that you’ll need to run it from inside the folder structure that we set up in the first tutorial.